When it comes to a solar charge controller, there are many different options available. Most people don’t know what they want and end up buying a solar charge controller that is either too expensive or doesn’t work as well as it should. This is why we have written this article explaining the different types of solar charge controllers, and how to choose one that will suit your needs.
Table of Contents
What is a Solar Charge Controller?
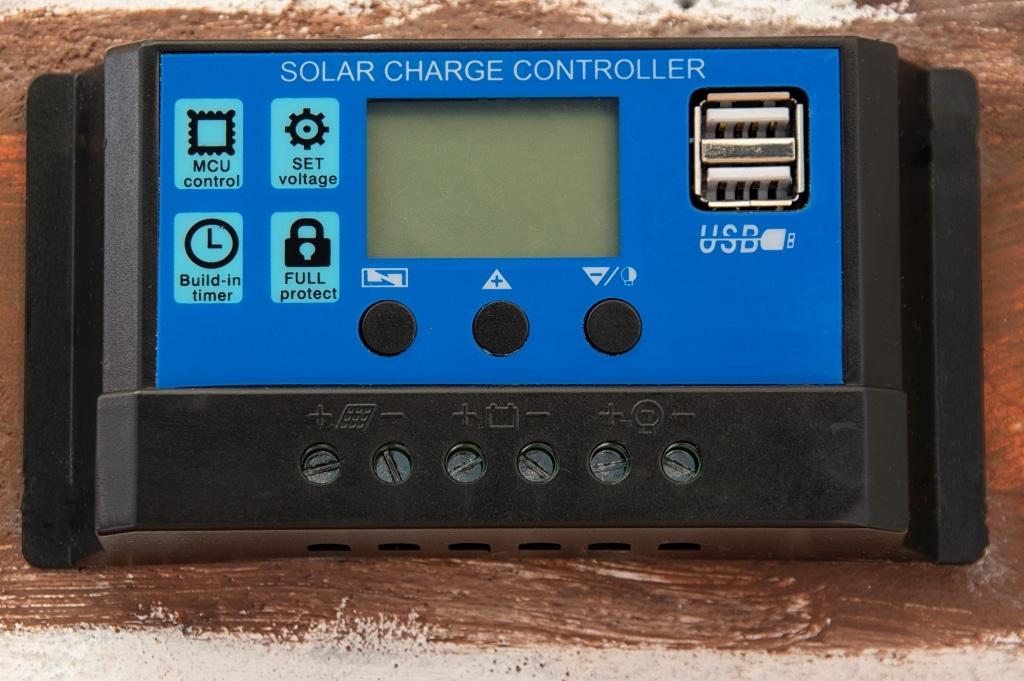
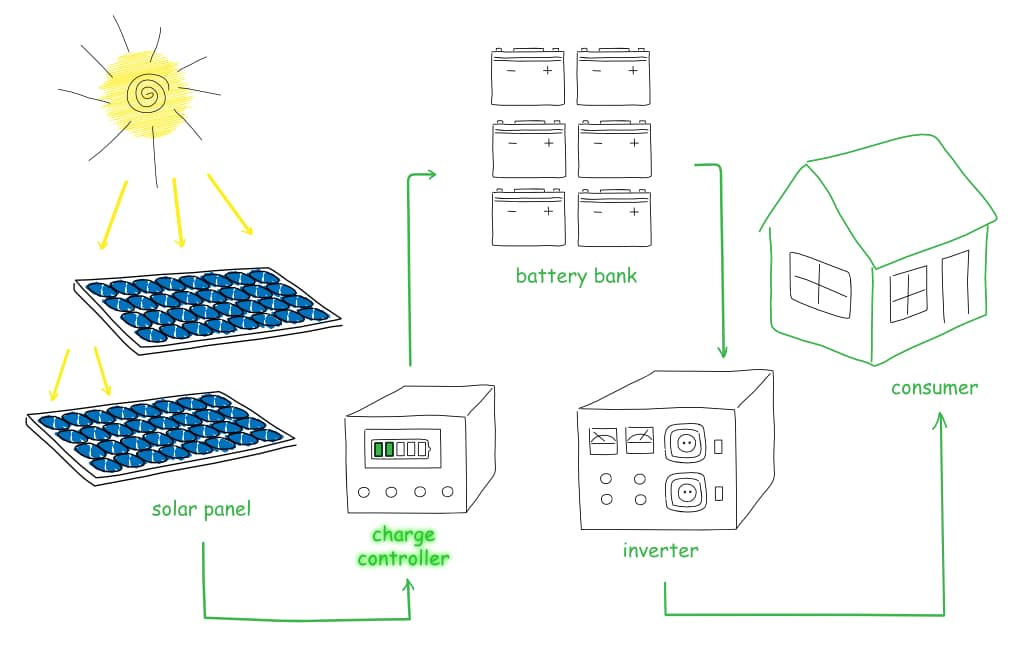
A solar charge controller (SCC) is an electronic device that is installed between your solar panels and the battery bank. It is used to regulate the amount of current that flows into your battery bank. This regulation ensures that the solar panels deliver the right power to the batteries so that the batteries are not over-charged or over-discharged.

Batteries require a suitable voltage for them to begin charging. For example, a 12 volts battery needs around 14.4 volts to be fully charged without damaging the battery. However, a solar panel’s output voltage varies with sunlight intensity and temperature. A standard 12 volts rated solar panel can produce 17-22 volts under different environmental conditions. That is where a charge controller comes in. By monitoring the voltage and current coming from the panels, it supplies a desired voltage to the battery at a safe load for charging. While the battery fills level percentage changes, the desired voltage also changes and the charge controller will take care of that for you too.
On ‘rainy’ days and nighttime, it also acts as a check valve that prevents the backflow of current to the solar panels.
Types of Charge Controllers
Among the various size and brands of SCC, there are mainly 2 types – Pulse Width Modulation (PWM) and Maximum Power Point Tracking (MPPT) charge controller. Here is the difference between them.
Pulse Width Modulation
PWM controllers are used to regulating the flow of power to the batteries by turning their switches on and off at varying intervals. As such, this method of regulation allows the charging of the battery by the short pulses without overcharging the batteries. This charge controller requires the panel rated voltage to be the same voltage as the battery for it to work.
In turn, this auto-on-off sequencing modulates the voltage and affects the efficiency of the controller to about 80% of the power produced by the panels. During sunrise and sunset, when the sunlight is at its lowest, your battery might not even begin charging until it reaches the desired voltage.
The PWM controllers in use today are relatively simple to install, and they’re easy to program. If you are planning for a small solar system for your off-grid home, a PWM controller might just be the one for you.
Maximum Power Point Tracking
MPPT controllers are designed to work with solar panels that have different voltage outputs and configurations. For instance, if you have an array of 3 20 volts panels in series, the right-sized MPPT will be able to regulate the output down to safely charge your 12 volts battery. This device is designed to monitor and alter the current to receive the most ideal amount of voltage for charging.
Let’s compare this with a PWM setup. On a cloudy day, when the voltage is low, charging the batteries will take a long time. With an MPPT charge controller and a series of few panels in the string, it can adjust the current to match the ideal battery voltage for charging even when sunlight intensity is at a minimum.
This way, you can charge the battery at its maximum capacity and receive up to 90% efficiency!
Although the MPPT can cost a lot more than PWM, you can start to see savings from the wires. Higher voltage configurations from your panels to charge controllers means lesser current and thinner wires. This is ideal for medium-large-sized off-grid systems.
| PWM | MPPT | |
| System size | Small scale | Medium-large scale |
| Cost | Cheap ($15-$50) | Expensive ($100-$700) |
| Voltage size | Array voltage same as battery voltage | Array voltage can be the same or higher than battery voltage |
Sizing a Solar Charge Controller
To get the most out of your solar power system, you’ll need to be sure that you have the right charge controller for your system. If you have not calculated your off-grid home power requirements or determined your solar array size, you can do that here.
To make sure that you’re getting the right charge controller, here are a few things you need to know:
- Battery bank voltage rating (12V, 24V, 36V, 48V)
- Controller input voltage rating – This has to be in line and compared with the solar output voltage.
- Controller output current – You can work this out by taking your solar array watts dividing it by your battery bank voltage rating.
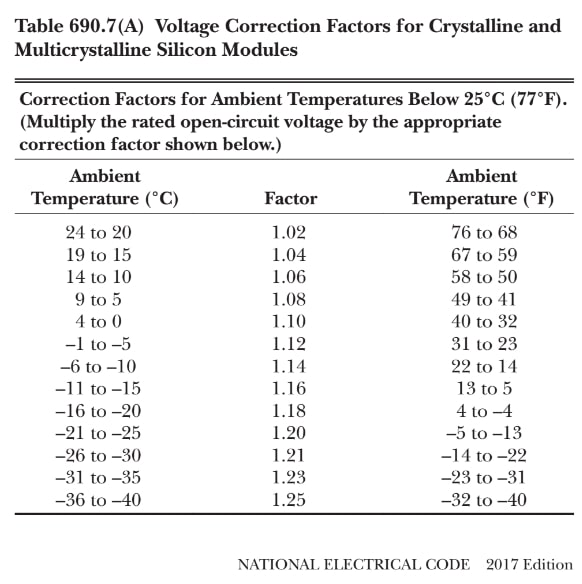
- Nominal voltage and Open circuit voltage (Voc) of solar panels – If the nominal voltage for a panel is 12 volts, the Voc is around 22-24 volts. This value is what you should be interested in and can also be found on your panel’s spec sheet. But do note that the Voc may vary with temperature. As the temperature gets colder the Voc increases. You can either work out the new Voc with the Voc temperature coefficient or use the PV array temperature correction table.
- Panels in series and parallel connection – In case you are unsure, solar panels connected in series add up voltage while parallel adds up current.
By understanding these 5 parameters, let’s take a look at a few scenarios while sizing the charge controllers.
Sizing your PWM Charge Controller
As mentioned, your array output voltage and battery voltage should match the PWM charge controller. The other important parameter is the amperage and you do not want to have a controller amps to be lesser than what your system can output.
Example 1:

1 String
1 12V Nominal solar panel ≈ 24 Voc
Solar system voltage: 12V battery
Isc = 10.2 amps
10.2 x 1.25 = 12.75 amps
Here you need to size your PWM with a 25% safety margin to your Isc. A 15 amps PWM will be suitable for this application.
Example 2:

2 String
2 12V Nominal solar panels in parallel
Solar system voltage: 12V battery
Isc = 10.2 amps
10.2A x 2 strings x 1.25 = 25.5 amps
Similarly, you need to size your PWM with a 25% safety margin to your Isc. A 30 amps PWM will be suitable for this application.
So when you look for the PWM, you need to make sure the controller nominal voltage is suitable for your battery banks voltage. In this both examples, 12 volts. Next, you need to size the PWM amperage higher than the factored current calculated.
Sizing your MPPT Charge Controller
MPPT charge controllers are more flexible when it comes to solar array configurations. You can size your panel array larger and they can manage much higher voltage panels than batteries. When sizing MPPT, there are 2 ratings you need to note. The input voltage and output current of the charge controllers. Unlike the PWM, the allowable input voltage is much higher than your battery voltage.
That is where the charge controller magically brings the voltage down to the voltage suitable for charging. Let’s go through another example to size your MPPT.
Example 3:

1 string
4 12V Nominal solar panels in series ≈ 96 Voc
200 Watts per panel
24V battery
Lowest temperature: -20°C
For this case, you need to factor in the lowest temperature you’ll experience in your region. The Voc, in this case, will be increased when it hits -20°C. Simply factor in with the value 96 x 1.18 = 113.28 Voc. This will be your new Voc and it must be below the input voltage of the charge controller.

Next, 4 200 watts panel gives you 800 watts and divide by the battery bank voltage of 24 volts. Your output amps will be approximately 33.3 amps.
With these 2 values, you will be able to size your MPPT solar charge controller. And a Victron SmartSolar MPPT 150|45 might be able to suit your system. Finally, double-check the specification of your charge controller and see if it can handle the 800 wattages.
Just be aware not to size your charge controller’s upper limit voltage lower than the calculated Voc or else you will burn it up in no time.
Can Two Solar Charge Controllers Charge the Same Battery?
Yes, you can do that. As a matter of fact, you can even use a few MPPT charge controllers to charge the same battery bank. If you plan to upgrade your solar system in the future, you can add on to your existing module by module.
Final Note:
A solar charge controller is an important component in your home’s solar system. For an off-grid home that depends entirely on solar energy, you will need at least 7kW per day which will roughly require 10-15 300 watts panel. For this application, you will need an MPPT charge controller to manage your battery charging. So, learning how to size it properly will ensure that you get the best value for your money.
More Helpful Solar Energy Information
- How Many Solar Panels Do I Need To Go Off The Grid? – In here, we’ve got a step-by-step guide on how to calculate your energy requirements and solar array size for your off-grid home.
- On Grid Vs Off-Grid Solar System – What’s the difference and which system is better for you? In any case, you need to understand the difference before you stay on the grid or off the grid. This post explains it for you.
- How Do I Power My House Off The Grid? – If you are looking for various options to power your off-grid home and don’t know where to look, check out these 5 options in this article and decide for yourself.
- More Lower Or Less Higher Wattage Solar Panels? – Are you confused about choosing the right panel wattage and size? This post compares the cost, efficiency and panels footprint so that you can get the best out of your solar array!
- How Many Batteries Do I Need To Go Off-Grid? – Batteries are very expensive and oversizing is not a smart move! This post will break down the itsy-bitsy details and will help you understand how to calculate the required number of batteries for your off-grid home.

